Applying for space
In order to use the FAU archive you need to fill out the application form.
The archived data will (by default) have a retention time of 10 years (i.e. be kept 10 years on tape). Chose the retention period with care, because it cannot be altered afterwards and data will be deleted without further notice once the retention period expired! Checking the expiration date of your archived files (see below on how to do that) – it’s your responsibility!
The default of 10 years was chosen because that usually is what e.g. DFG requires.
There are also archive classes to keep data only 1, 2, or 5 years.
There are also archive classes with 25 and 99 years which are much more expensive. However, please be aware that RRZE can not really guarantee such long periods – in fact it is pretty unrealistic that the data will be kept for that long without a system change. This is merely intended as a marker that you probably want to or have to keep this data for a very long time.
Using the Archive
The archive can only be accessed from a specific server.
Log onto fundusa1.rrze.uni-erlangen.de using SSH. This frontend can only be reached from the university network (including VPN).
Your RRZE-Linux-$Home as well as the HPC-NFS filesystems are (auto)mounted on fundusa1. The RRZE-Windows-Home can also be found at /home/rzwin/$USER. Group ids on the HPC file systems may not resolve correctly on fundusa1.
If you are logged into fundusa1 for a long time (at the time of writing this, more than 1 day), your Kerberos ticket will expire, and access to the RRZE-Homes will no longer work, resulting in „Permission denied“ errors when trying to access it. To solve this issue, just log in again. Advanced users may also extend their kerberos tickets a few times (maximum 1 week) – the tool you might want to google for that is ‚krenew‘.
Local storage is available on fundusa1 in case you have to transfer („stage“) the data before (e.g. using rsync, scp, etc.). To allocate temporary, local disk space for staging files, use
ws_allocate SOMENAME 7
The generated directory will be displayed. The directory name will consist of your user name and the name you give as SOMENAME.
The directory will automatically be removed after the specified duration (7 days – the last argument of the command above).
Transfer/Copy your data into your staging directory /staging/$USER-SOMENAME
For optimal use of the archive, tar/zip small files before archiving them!
The archive is optimised to handle a small number of large files.
Archiving a large number of files (several ten) at once, is a good indication that you should pack these together into a .zip/.tar.gz/.7z-archive first and store that one instead. Of course this does not apply if the resulting zipfile would be way too large, e.g. far exceed 100 GB.
Both commands, dsmc and dsmj (see below) tend to write log files to the current directory. Thus, remember to start them from a directory where you have write permissions, otherwise the commands will fail with Permission denied.
Using the GUI
There is a X11-based Grafical User Interface (GUI).
In order to be able to use it you must add the option -X or -Y to your ssh call and have an X-Server running locally. Microsoft Windows users may use MobaXterm which is a SSH-client with a builtin X-Server.
The GUI can be started by dsmj.
The most important actions:
- Archive/Archive (main panel)
- Archive/Retrieve (main panel)
- Utilities/Delete Archive Data (top panel)
To select a specific archive class (e.g. with only 1, 2 or 5 years retention:
on the archive plane -> Options -> Override incl/excl list => Mgmt Class.)
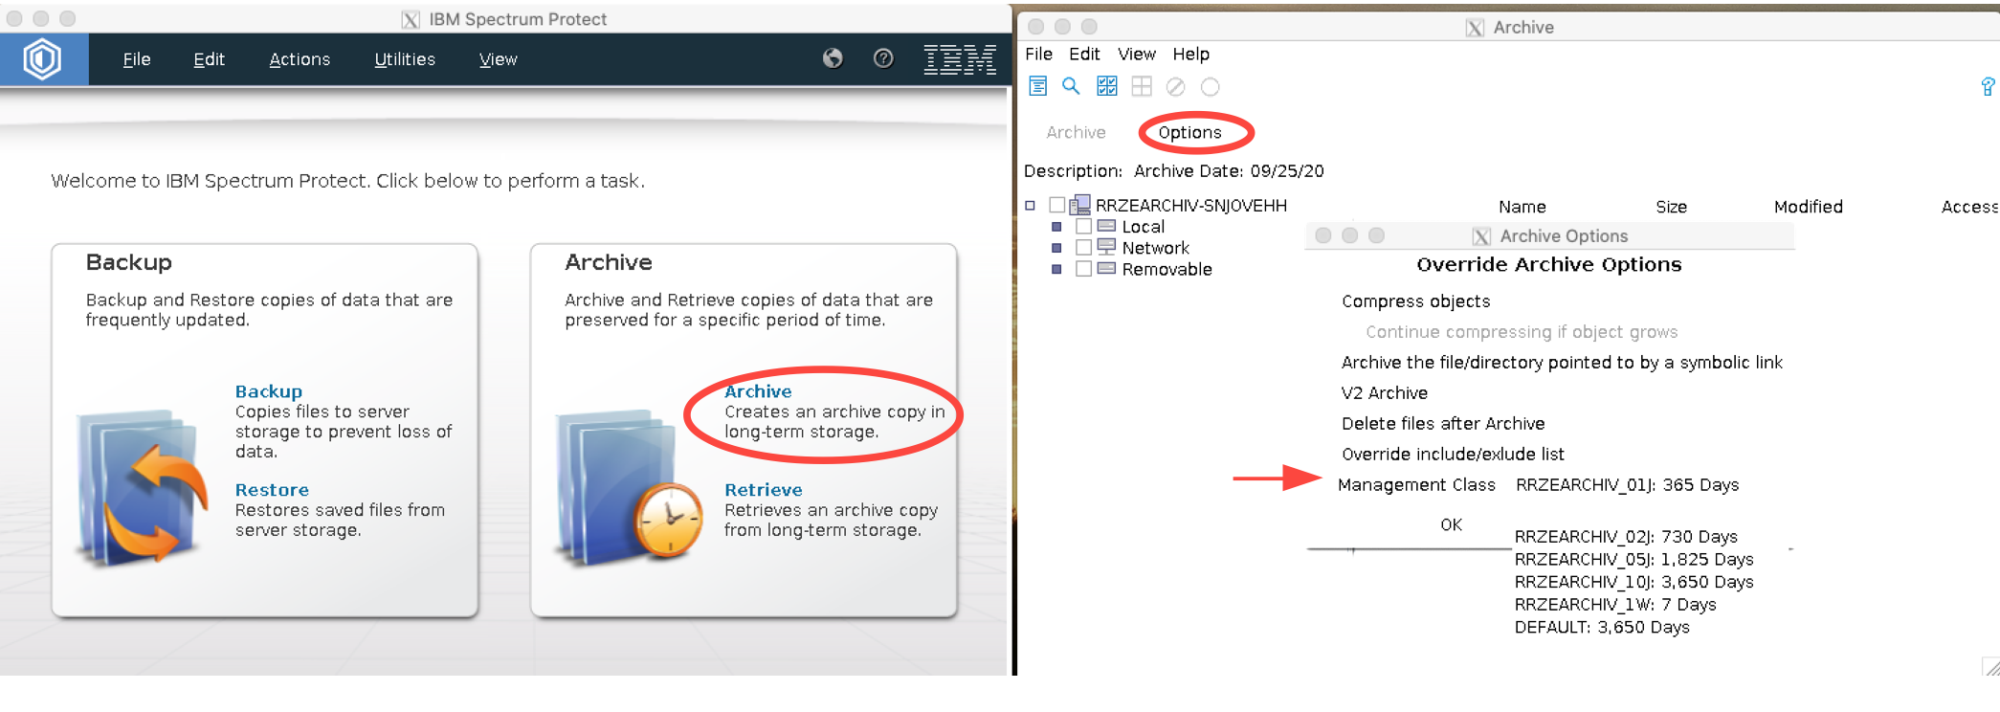
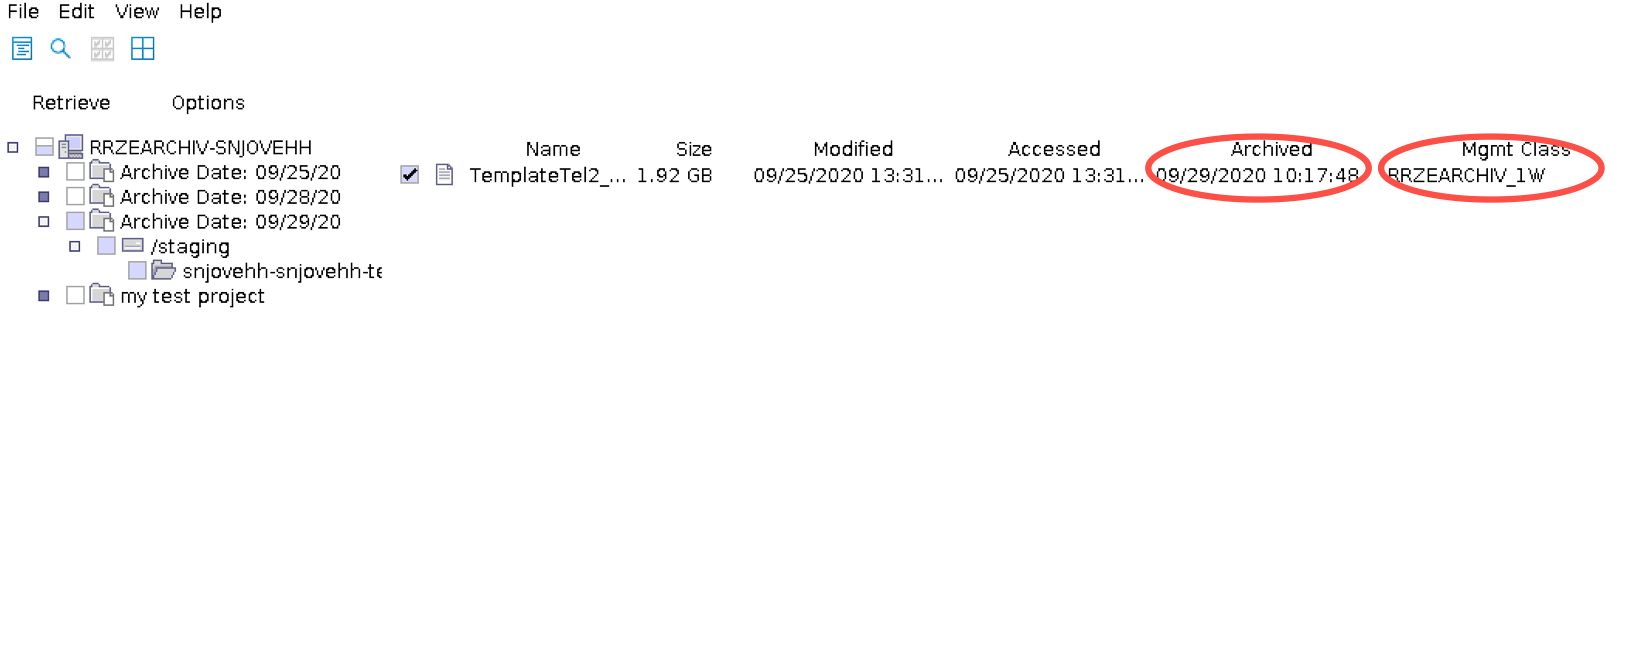
Checking retention of archived data
There is no expiry date shown in the GUI, however you can find the archive class and the archive date and calculate it from there. To see this information select a file in the Retrieve window.

Using the commandline
Archiving data using command line
To create an archive use dsmc archive with suitable arguments.
The most important options are:
-desc="your project description is here; max 256 characters"-archmc=RRZEARCHIV_##J with ##=01, 02, 05, 10; while the data will be stored for 10years if nothing is selected, we strongly advise to always explicitly request a specific class and not rely on the default.-deletefiles delete files from your staging directory after archiving-subdir=yes subdirectories are included in the archive
A full command could look like this dsmc archive -desc="project_A Partial archive #1" [-deletefiles] -subdir=yes /staging/$USER-archiv/projA-a1/
Retrieving data using command line
To query your archive on the command line use dsmc query archive /staging/$USER-SOMENAME/project/
You need to specify at least parts of the path and the slash at the end is important!,
You can adding -subdir=yes (will show subdirectories as well) or -desc="your archive description" (will only show archives with matching description) for additional selection in the output list.
Using dsmc query archive is the only way to display the expiration date of your archives!
To retrieve data on the command line use dsmc retrieve
An example could look like:
dsmc retrieve -replace=no -subdir=yes -desc="project_A Partial archive #1" /staging/$USER-archiv/projA-a1/ [DESTDIR]
the -replace=no prevents accidental overwriting of existing files in [DESTDIR].
Querying your archive / finding your archived data
Proper organization of your data before archiving is mandatory.
Checking retention of archived data
You can check the retention of archived files using the dsmc query archive command. The expiry date will be listed in the output (see screenshot below).
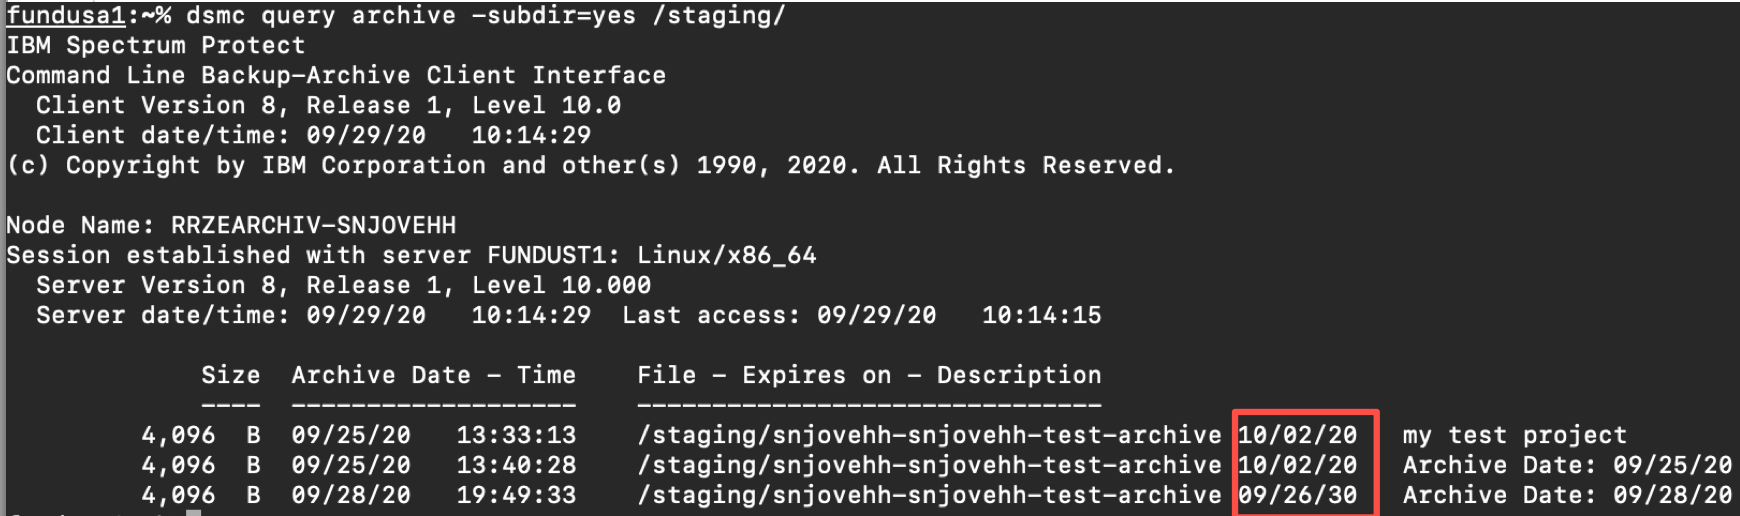
The trailing slash when specifying directory for the query is important. dsmc query archive -subdir=yes /staging will not find anything!
Further usage of the command line
To delete archived data in the archive before the retention period expired, use dsmc del
e.g., dsmc del archive -desc="project_A Partial archive #1" /staging/$USER-archiv/\*.zip [-pick]
Get help on the dsmc command
dsmc help
Note
If no description is specified, the current date is used by default.
If the same file is achieved with different descriptions, it will be multiple times in the archive (and also accounted multiple times)